
Starlink Mini accessories that make your setup faster and safer are usually not the flashy add-ons. The most useful ones are the accessories that reduce setup time, improve placement, protect cables, and give you more reliable power in real-world conditions. That matters because the Starlink Mini is already designed as a compact, portable kit with integrated Wi-Fi, a kickstand, a mini pipe adapter and flat mount, a 15 m DC power cable, and a power supply right in the box. In other words, the basic hardware is covered. The job of accessories is to make the system easier to deploy, easier to protect, and less likely to fail because of weak mounting, bad cable routing, or unstable power.
For most users, the smartest accessory choices come down to five practical goals:
This guide breaks down which accessories actually help, which ones are situational, and what to check before you buy.

Before spending money on accessories, it helps to know what comes standard. The Starlink Mini kit already includes the dish with integrated Wi-Fi, a kickstand, a mini pipe adapter and flat mount, a 15-meter DC power cable, and a power supply. Starlink also lists the Mini as having software-assisted manual orienting, a 110° field of view, average power consumption of 25–40 W, and 12–48 V 60 W input. That is a strong starting point for a portable system.
That also means not every user needs to buy a pile of extras on day one. If your setup is mostly temporary and you only use the Mini in open areas, the included kickstand and mount hardware may be enough. Accessories become more important when you want faster repeat deployment, vehicle use, better cable protection, cleaner power options, or safer long-term mounting.
The Starlink Mini is portable by design, so many people move it between locations: campsites, work sites, vans, cabins, rooftops, and emergency setups. Portable gear gets handled more, packed more often, and exposed to more cable stress than fixed residential gear. A good accessory setup reduces that friction.
Starlink’s own support guidance also makes placement a major factor. The company recommends using the “Check for Obstructions” tool in the Starlink app to find a location with a clear sky view, because obstructions are a direct cause of interruptions. That is exactly why stable mounts and better placement accessories are not just convenience upgrades; they can improve day-to-day usability.
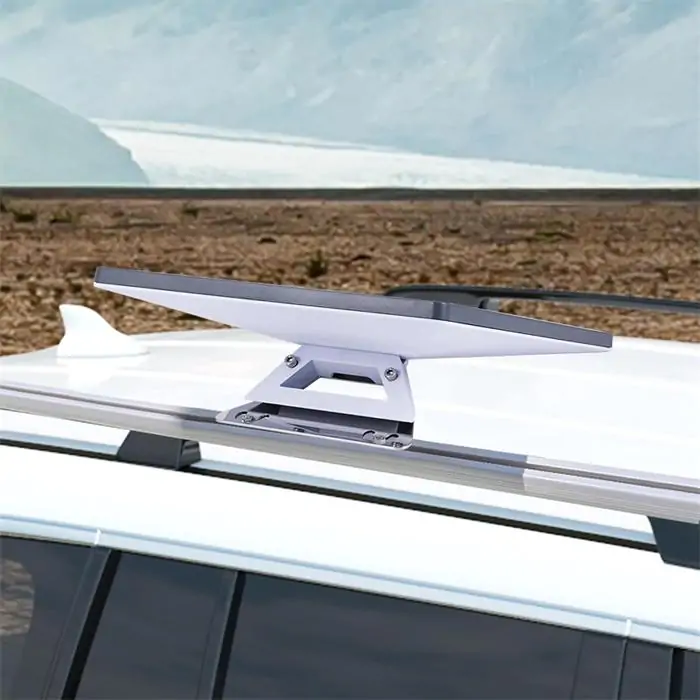
If your Mini is used in more than one place, or used in wind, uneven ground, or on a vehicle, the included kickstand may not be the fastest or safest long-term solution. A stronger mount helps you set the dish down faster, keep it aligned, and reduce the chance of movement or accidental falls.
Starlink’s specifications show that the Mini uses software-assisted manual orienting and has a wide 110° field of view, but that does not remove the need for a stable placement. Starlink also notes that if the unit is misaligned or laid flat, you may see service interruptions, including problems caused by rainwater accumulating on the surface.
A mount upgrade makes the most sense if you:
Choose a mount that offers:
A traveler using the Mini on weekend road trips may be fine with the kickstand at first. But after a few setups on gravel, wet grass, and sloped ground, a dedicated pipe or vehicle mount saves time and reduces repositioning. That is not about luxury. It is about repeatability.
A Starlink setup can fail even when the dish itself is fine. In many cases, the weak point is the cable path: sharp bends, loose runs, trip hazards, door pinch points, abrasion on metal edges, or poor strain relief where the cable enters the unit or power source.
The Mini kit includes a 15 m DC power cable, which gives users useful reach out of the box. But the longer the cable run, the more important neat routing becomes. A messy install is slower to set up, harder to pack away, and more vulnerable to accidental damage.
Useful cable-related accessories include:
A better cable path makes the setup safer in two ways:
That matters even more in mobile environments or temporary field setups.

Starlink lists the Mini at an average of 25–40 W power consumption, with 12–48 V 60 W input. It also states that if you want to power the unit with the optional USB-C to barrel jack cable, you need 100 W, 20 V/5 A minimum. That is a critical spec, because many casual buyers assume any USB-C power bank will work. Many will not.
For mobile or backup use, the most valuable accessories are usually:
When your power system is already matched to the Mini, setup becomes almost plug-and-play. You are not hunting for AC outlets, improvising converters, or testing underpowered batteries that reboot the unit. Faster deployment often comes from power simplicity, not just from the dish itself.
Do not judge a power accessory by connector shape alone. Match it to the Mini’s actual requirement. A USB-C battery that tops out below 100 W is not the right fit for the official USB-C barrel accessory path.
A wired connection can be helpful if you want:
The Mini specifications list one latching Ethernet LAN port with the Starlink plug system, which makes wired networking possible.
Starlink explicitly says that Power over Ethernet is not supported on Starlink Mini. If you plug in a PoE Ethernet cable, you still need the provided power source. That means buyers should be careful with third-party accessories that imply a simpler one-cable PoE solution.
There is another detail many buyers miss: Starlink’s Mini spec sheet says the unit is rated IP67 Type 4 with the DC power cable and Starlink plug/cable installed, but it is no longer rated IP67 with a standard RJ45 cable. In plain terms, wired accessories can be useful, but they may reduce environmental sealing if you move away from the Starlink-specific connection approach.
For indoor or fair-weather use, Ethernet accessories can be very useful. For exposed installs, the smarter choice is to prioritize proper sealing and cable protection rather than chasing the cheapest generic adapter.

Portable internet hardware spends a lot of its life being moved, stacked, packed, and unpacked. That is exactly when scratches, bent connectors, crushed cables, and missing small parts happen.
A good case speeds up setup because everything stays organized:
A good Starlink Mini case should have:
A mobile worker who deploys the Mini three times a week will save more time with an organized hard or semi-hard case than with almost any “performance” add-on. It reduces packing errors and keeps the system ready.
Not every useful upgrade is electronic. Sometimes the best purchase is simply the accessory that helps you reach a clearer view of the sky faster.
Starlink’s help center emphasizes that obstructions cause interruptions and recommends using the app’s obstruction-checking tool to find a better location. That makes accessories like pole extensions, flat-mount options, and stable temporary mounts especially practical. If an accessory helps you avoid trees, roof edges, or vehicle shadowing, it may do more for real-world performance than a more expensive add-on elsewhere in the setup.
Some accessories are useful only for certain users. These include:
The key is to buy according to your setup pattern, not someone else’s gear list.
Before buying any accessory, ask these questions:
For example:
This matters most for:
The best accessories do both. They save time and reduce risk.
The smartest Starlink Mini accessories that make your setup faster and safer are usually the ones that support the fundamentals: stable mounting, cleaner cable routing, correctly matched power, weather-aware connections, and better storage. Because the Mini kit already includes a kickstand, a mini pipe adapter and flat mount, a 15 m DC cable, and a power supply, most buyers do not need to rush into every add-on at once. Start with the accessory that solves your biggest deployment problem first.
For many users, that first upgrade will be a better mount. For others, it will be a properly rated mobile power option or a case that keeps the kit organized. The right answer depends on how you use the Mini: fixed, mobile, off-grid, vehicle-based, or emergency backup. The best accessory setup is not the most expensive one. It is the one that helps you get online faster, protect the hardware better, and avoid preventable problems in the field.
More Guides:
How to Choose the Best Starlink Mini Accessories for Optimal Performance
Starlink Parts Buyer Guide: How to Choose the Right Accessories
Starlink Parts Guide: What You Really Need for a Stable Setup